Authentication and Authorization in FARM Stack using JWT
TABLE OF CONTENTS
Introduction
I'm currently working on a personal project that improves numeric calculations on a cluster and gathers all kinds of data that can be reviewed by scientists in a specialized web application.
The system that I'm building contains multiple parts, some are running on a cluster, while others are in a stack that contains databases, APIs, and web applications.
The obvious path for an API implementation would be to use a premade solution that takes care of everything, such as Django REST framework. However, that's not fun! I already had a chance to work with Django/Flask and doing it again for a personal project is a wasted opportunity to try and learn something new.
I've read about FastAPI, but haven't had the time to try it out. So this is a perfect timing to go with the FARM stack, which includes FastAPI, React, and MongoDB. I'm not sure if I'll stick with React, but the authentication and authorization part will definitely be implemented using FastAPI, MongoDB, and JWT token.
This post heavily relies on the GitHub repository: Youngestdev/fastapi-mongo. It's a nice solution and many thanks to its creators!
Since the repository has all the code that it's needed to follow the implementation, I wouldn't dive deep into the code itself, but explain the ideas, libraries, and structure behind the implementation.
I hope you'll find this overview useful, and if you have any additional questions and suggestions, please don't hesitate to reach out.
FastAPI
Basics
FastAPI is a modern, high-performance, web framework for building APIs with Python 3.7+.
Compared to Django, FastAPI is lightweight and built for efficiency with minimalistic approach and few dependencies. Additionally, the difference between FastAPI and many other web applications is that it implements ASGI using Starlette, which is a lightweight ASGI framework ideal for building asynchronous web services in Python.
WSGI (Web Server Gateway Interface), is a standard specification for universal interface between web server and web application. The WSGI servers are not that efficient, since they are synchronous. On the other hand, ASGI (Asynchronous Server Gateway Interface) is asynchronous which allows multiple incoming/outgoing events and background coroutines so the application can do other things. If you want to find out more in greater detail, see ASGI Specifications.
To run FastAPI, besides fastapi package, we need
Uvicorn - poetry add uvicorn.
To manage virtual environment and packages, I'm using poetry. If you are not familiar with the tool, I would suggest taking a look, it's really powerful and useful.
The following example defines a simple root endpoint which returns
message: Hello World
from fastapi import FastAPI

app = FastAPI()

@app.get("/")
async def root():
    return {"message": "Hello World"}
This only defines GET HTTP method on root i.e. / using @app.get("/").
In the similar manner we can define other routes with different methods
@app.<PostLink url=""<path>"">post|put|delete|options|head|patch|trace</PostLink>.
Path parameters are defined in the usual form:
@app.get("/items/{item_id}")
async def read_item(item_id):
    return {"item_id": item_id}
For more information, please see FastAPI's documentation Path Parameters
Similarly, query parameters:
@app.get("/items/")
async def read_item(skip: int = 0, limit: int = 10):
    return get_items(skip, limit)
When it comes to request body, FastAPI uses pydantic models. Pydantic is a really powerful library for data validation and settings management. It enforces type hints at runtime and provides user-friendly errors when data is not aligned with the model i.e. is invalid. I've used this library in many other projects, especially in data engineering tasks.
Pydantic models are classes that inherit from BaseModel. For
example, a
model that defines a User can be defined as follows:
from typing import Optional
from pydantic import BaseModel


class User(BaseModel):
    first_name: str
    last_name: str
    email: Optional[str]
    region: str = "Europe"


user = User(
    first_name="A",
    last_name="B",
)
print(user.dict())
This will output:
{'first_name': 'A', 'last_name': 'B', 'email': None, 'region': 'Europe'}
The typehints are enforced, meaning it will throw ValidationError if
something else is provided. The field types can be from the standard library
(None, int, str ...), pydantic types
(FilePath, PastDate, FutureDate ...), or you can implement your own
pydantic-compatible types with custom properties and validation.
For more information about field types, please see Field Types.
Authentication
The topic of authentication and security, in general, is very broad and complex. Like many other web frameworks, FastAPI provides several tools that can help us deal with security easily and in a standard way.
The module fastapi.security contains the following classes:
- API:
APIKeyCookie,APIKeyHeader,APIKeyQuery - HTTP:
HTTPAuthorizationCredentials,HTTPBasic,HTTPBasicCredentials - OAuth2:
OAuth2AuthorizationCodeBearer,OAuth2PasswordBearer,OAuth2PasswordRequestFormStrict
and others.
To get the full list, please see fastapi/security/__init__.py
Adding a simple authentication can be done using HTTPBasic.
from fastapi import Depends, FastAPI
from fastapi.security import HTTPBasic, HTTPBasicCredentials
from typing_extensions import Annotated

app = FastAPI()
security = HTTPBasic()


@app.get("/")
def root(credentials: Annotated[HTTPBasicCredentials, Depends(security)]):
    return {"username": credentials.username, "password": credentials.password}
This will prompt a standard HTTP authentication from the browser.
However, HTTPBasic is not enough to cover our requirements, what we need is
OAuth2.
OAuth2 is a specification that defines how we can implement authentication and authorization in multiple ways. It's quite extensive and covers a lot of complex use cases. All third party authentication systems are built on top of OAuth2.
If you are interested in reading the specification document, please see: The OAuth 2.0 Authorization Framework
Basically, it specifies that we must send a username and password fields as
a form data. Then we must return a JSON object that has access_token and
token_type, in our case that's Bearer, since we are using Bearer tokens.
The implementation of the /login route could look like this:
@app.post("/login")
async def login(form_data: Annotated[OAuth2PasswordRequestForm, Depends()]):
    user = get_user_from_db(form_data.username)
    if not user_dict:
        raise HTTPException(status_code=400, detail="Incorrect username or password")
    password = verify_password(user.password, form_data.password)
    if not password:
        raise HTTPException(status_code=400, detail="Incorrect username or password")

    return {"access_token": "something", "token_type": "bearer"}
The passwords need to be hashed, we don't want to store passwords in plain text
in the database. Hashing and verifying passwords is used doing passlib, which
is a library that implements all kinds of different hashing algorithms
including deprecated old ones. The recommended algorithm is
Bcrypt.
Installing passlib with bcrypt can be done using poetry add "passlib[bcrypt]"
The access_token is the token that authorizes a user on protected
routes. Implementing this in FastAPI requires a token_listener that
verifies the access_token and a APIRouter that will be included with
a dependency on token_listener:
app.include_router(
    Router,
    tags=["Something"],
    prefix="/protected",
    dependencies=[Depends(token_listener)],
)
For more information and in-depth guide, please see Simple OAuth2 with Password and Bearer.
Beanie
The FARM stack has a MongoDB database in the background to store application data including everything that's needed for user authentication.
Interacting with MongoDB instance through Python code can be easily done using
the pymongo library which is the official MongoDB driver for synchronous
Python applications.
However, dealing with pymongo can be tiresome, like using mysql.connector
in case of MySQL. Since I already have some experience with pymongo, I
wanted to try a similar approach to ORM but for document databases i.e. ODM -
object document mapper. The library that creates a wrapper around pymongo and
implements asynchronous ODM is
Beanie.
Its document models are based on pydantic which offers a lot of flexibility
and validation schemes, as previously mentioned in case of FastAPI's requests.
Document in Beanie is connected to a collection in a database, for example:
from beanie import Document
from pydantic import EmailStr

class User(Document):
    fullname: str
    email: EmailStr
    password: str
    birth_year: int
Before we can use Beanie we have to initialize AsyncIOMotorClient with
MongoDB connection string and then initialize Beanie with document models
from beanie import init_beanie
from motor.motor_asyncio import AsyncIOMotorClient

async def initiate_database():
    client = AsyncIOMotorClient("mongodb://<username>:<password>@<host>:<port>")
    await init_beanie(
        database=client.get_default_database(),
        document_models=[User]
    )
If you want to play around with Beanie, you can pull the MongoDB docker image and initialize Beanie with the appropriate connection string.
Once the connection is established and document created, we can do the usual
CRUD operations Document.[insert|delete|update|replace...], and many more
(Document).
Beanie also supports query builder, which means that we can chain different commands with comparison operators
class UserShortView(BaseModel):
    name: str
    birth_year: int

users = await User.find(
    User.name == "John",
    User.birth_year > 1990
).sort(-User.birth_year).limit(10).project(UserShortView)
If we want to fine-tune our query, we can provide the PyMongo native expression
users = await User.find({"birth_year": {"gte": 1990}}).to_list()
For more examples of Beanie features, please see Announcing Beanie 1.0 - MongoDB ODM with Query Builder
Some of the advanced MongoDB options can be defined using Settings for a
Document. It covers the following features:
- MongoDB collection name
- Indexes
- Encoders
- Use of revision_id
- Use of cache
- Use of state management
- Validation on save
Therefore, if we want to have different names for a model and collection, we
can specify that using name field in Settings inner class:
class Users(Document):
    num: int
    description: str

    class Settings:
        name = "customers"
To learn more about Indexes, Caches, and Encoders, refer to Beanie's documentation on Defining a document
JWT
Now that we have everything that we need for implementing authentication, let's understand how and why we use JWT.
JSON Web Token (JWT) is an open standard (RFC 7519) that defines a compact and self-contained way for securely transmitting information between parties as a JSON object.
The idea behind JWT is not to hide information, it's not encrypted (encryption is optional), but it's signed. Signed tokens can verify the integrity of information, so no one can alter the data within JSON object without our knowledge. JWTs can be signed using a secret using HMAC SHA-256 algorithm or a public/private key pair using RSA) / ECDSA.
Additional information about algorithm specification is available at Implementation Requirements
JWT can be used for many things, but most commonly it's used for authorization. The user logs in, receives a JWT token and each subsequent API call includes the token that is used to verify the user and authorize the access to different resources.
The structure of JWT consists of three parts:
- Header - contains metadata about the type of token and the cryptographic algorithm
- Payload - contains the identity of the user and the permissions they are allowed
- Signature - is used to validate the token and confirm that it has not been tampered with
Each part is Base64Url encoded and separated by dots: aaaaa.bbbbb.ccccc
JWT tokens are usually sent in the Authorization header using Bearer
schema. It's important to note that we should prevent the token from getting
too big, since some of the servers don't allow large headers.
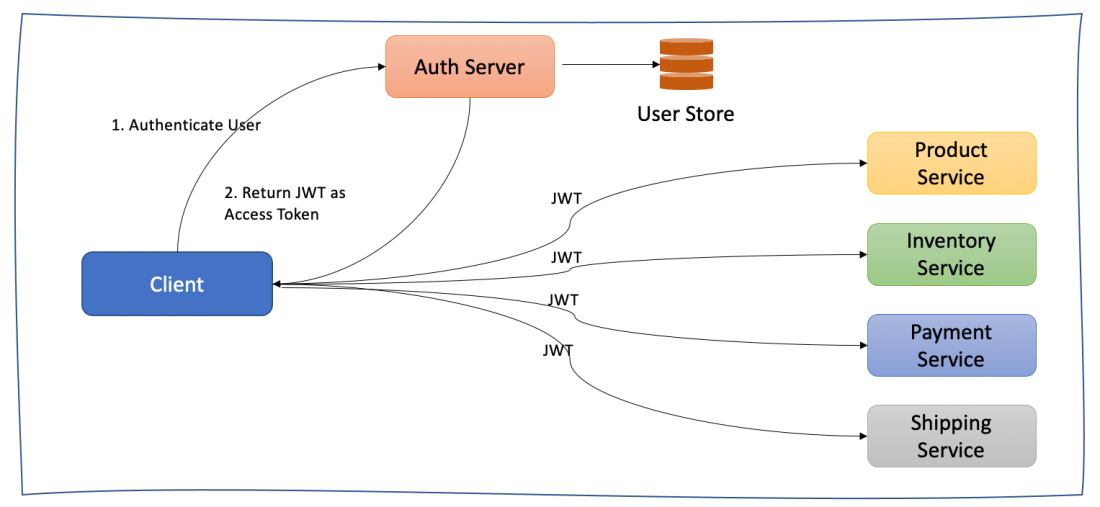
Additional advantage of using JWT that needs to be pointed out is when it comes to microservice-based applications. Using JWT we can avoid keeping user sessions, which is usually done in monolithic web applications, and let our applications independently scale across multiple servers or containers without the need to keep the state of the user:
Encoding and decoding JWT in Python code is made simple by using
PyJWT library. The
encoding method should be called when user authenticates on /login route,
and decoding for verifying JWT token on all protected API routes.
import jwt

def encoding(user_id: str) -> Dict[str, str]:
    payload = {
        "user_id": user_id,
        "expires": time.time() + 3600,
    }
    return token_response(
        jwt.encode(
            payload,
            secret_key,
            algorithm="HS256",
        )
    )


def decode_jwt(token: str) -> dict:
    decoded_token = jwt.decode(
        token.encode(),
        secret_key,
        algorithms=["HS256"],
    )
    if decoded_token["expires"] >= time.time():
        return decoded_token
    return {}
React in memory JWT
When it comes to frontend applications, dealing with JWTs becomes a bit harder, at least for me.
Storing JWTs in the browser can be done using the following methods:
- Local storage
- Session storage
- Memory
- Cookies
Local storage is not the best option, since it's not secured. Any JavaScript code can access the local storage, so cross-site script (XSS) can get the JWT token and gain the account access, as pointed out in multiple blogs:
While researching this topic, I came across a blog post that really goes into details on how to handle JWTs on frontend clients: The Ultimate Guide to handling JWTs on frontend clients (GraphQL). In a nutshell, they are proposing that we should use two JWT tokens, one for authorization and other for refreshing the token.
Authorization token is short lived ~5min, while
refresh token lasts for ~1h. Refresh tokens are stored in a database where they
can be easily invalidated if needed. The frontend application should do a
silent refresh - which means that the application will make API calls in
background on /token-refresh endpoint using both authorization and refresh
token to fetch a new JWT token before the previous JWT expires.
The authorization token is stored in memory (which additionally complicates things - refresh, multiple tabs etc), while the refresh token is stored in a cookie.
If you want to play around with this solution, check out Handling JWT in Admin Apps the Right Way. It's using a popular open source library for React Admin dashboard applications. The complete code example is provided at marmelab/ra-in-memory-jwt.
It was really interesting to read about this approach and understanding how it works. However, as I already mentioned in the Introduction section, implementing all of this for my personal project is maybe an overkill.