Building OpenMPI, BLAS, LAPACK, ScaLAPACK, NetCDF, Flook, and SIESTA
TABLE OF CONTENTS
Introduction
For the last couple of weeks I've been playing around with low-level libraries that provide routines for high-performance linear algebra operations. From the lowest ones like BLAS to others that offer distributed and parallel implementations of routines, like ScaLAPACK.
Since these libraries are the building blocks of scientific computing applications like SIESTA and many other popular tools like SciPy, NumPy etc, I've decided to build everything from source and set up SIESTA on Scientific Linux.
This is not in any way a complete guide on how to set up the system, since that highly depends on your machine architecture and use case. However, if you are completely new to the whole process and not familiar with aforementioned libraries, this post can guide you while offering some theory and interesting facts that will help you understand the bigger picture.
Please let me know if you have any suggestions or notice any mistakes or omissions.
Libraries
GCC
We are first going to build GCC
from source. GCC is an optimizing compiler that supports various programming
languages, hardware architectures, and operating systems. Among many frontends
for all kinds of languages, including C, C++, Ada, GO etc. GCC supports
Fortran, also known as gfortran.
In order to compile GCC from source, we need:
- ISO C+11 compiler - This is necessary for bootstrapping GCC
- make - In order to build GCC we have to have GNU make installed
- perl - Version between 5.6.1 and 5.6.26
- GMP - GNU Multiple Precision
Library - a library for arbitrary precision arithmetic, operating on signed
integers, rational numbers, and floating-point numbers. We can install this
using
download_prerequisites - MPFR - GNU Multiple Precision
Floating-Point Reliable Library - is a C library for multiple-precision
floating-point computations with correct rounding. We can install this
using
download_prerequisites - MPC - GNU Multiple Precision Complex - is a C library for the arithmetic of complex numbers with arbitrarily high precision and correct rounding of the result
The easiest way is to install older version of GCC from a package repository, use it to build a newer version and then delete the older one.
So the first step would be to install required libraries
yum -y install wget gcc-c++ make perl
Then we can use GCC mirror sites to pull the latest release
wget https://mirrorservice.org/sites/sourceware.org/pub/gcc/releases/gcc-12.2.0/gcc-12.2.0.tar.gz
tar xvf gcc-12.2.0.tar.gz
extract it, download prerequisites, and configure build in a separate
build directory. Do not run configure in the source directory, this is highly
discouraged, see
Installing GCC: Configuration
for more information
cd gcc-12.2.0
./contrib/download_prerequisites
cd .. && mkdir gcc-build && cd gcc-build
../gcc-12.2.0/configure --enable-languages=c,c++,fortran --disable-multilib
Then finally build it:
make
make install
This can take a while (depending on your machine), grab a coffee ☕
After the build completes. We can remove the older GCC and reload the environment:
yum -y remove gcc
source ~/.bash_profile
To test if everything works, run gcc --version
gcc (GCC) 12.2.0
Copyright (C) 2022 Free Software Foundation, Inc.
This is free software; see the source for copying conditions.  There is NO
warranty; not even for MERCHANTABILITY or FITNESS FOR A PARTICULAR PURPOSE.
and gfortran --version
GNU Fortran (GCC) 12.2.0
Copyright (C) 2022 Free Software Foundation, Inc.
This is free software; see the source for copying conditions.  There is NO
warranty; not even for MERCHANTABILITY or FITNESS FOR A PARTICULAR PURPOSE.
Now that we have the newest version of GCC, we can proceed with building other libraries.
OpenMPI
OpenMPI is an open source implementation of Message Passing Interface (MPI). MPI is a standardized communication protocol for programming parallel programs. It provides a standard for communication among processes that are running on a distributed memory system.
MPI remains the dominant model used in high-performance computing today1. It is used by many supercomputers that are ranked in the TOP500 project. This projects tracks trends in high-performance computing and publishes their findings during the International Supercomputing Conference and ACM/IEE Supercomputing Conference. One such supercomputer was Roadrunner, which was the world's fastest supercomputer from June 2008 to November 2009. Another example is K computer, the fastest supercomputer from June 2011 to June 20122.
In order to install OpenMPI, we need to download a tarball for a specific
version, run configure script and then make all install.
The current stable version is 4.1.4, at the time of writing. Other versions
can be found on the official download page
OpenMPI - Download.
There are many ways to configure the build, depending on the specific machine and use case, the example below is just an illustration, for more details please see OpenMPI - FAQ - Building Open MPI.
Additionally, we have to tell ld.so where to search for the dynamic shared
libraries. Since we installed gfortran we have to export the path to
libgfortran.so.5, which is located at /usr/local/lib64, using LD_RUN_PATH.
If you're wondering why LD_RUN_PATH instead of LD_LIBRARY_PATH, please see
LD_LIBRARY_PATH - or: How to get yourself into trouble!
wget https://download.open-mpi.org/release/open-mpi/v4.1/openmpi-4.1.4.tar.gz
tar xvf openmpi-4.1.4.tar.gz
cd openmpi-4.1.4
export LD_RUN_PATH=/usr/local/lib64
./configure --prefix=/usr/local
make all install
If everything went well, you should see symbolic links like mpif90,
mpirun, and mpic++ in the /usr/local/bin directory.
BLAS
BLAS stands for Basic Linear Algebra Subprograms and is a collection of routines that provide standard building blocks for performing basic vector and matrix operations. These routines have bindings for both C (CBLAS interface) and Fortran (BLAS interface).
The BLAS actually represents a specification of general low-level routines. The actual implementation depends on a particular machine and often provides different optimizations for speed that bring substantial performance benefits. For instance, it will take advantage of special floating point hardware such as vector registers.
This collection is divided into three levels that represent the degree of the
polynomial in the complexities of algorithms i.e. level 1 routines take
linear time
- Level 1 - a generalized vector addition of the form:
- Level 2 - a generalized matrix-vector multiplication of the form:
- Level 3 - a generalized matrix multiplication of the form:
If you are interested in more details, please see BLAS Technical Forum Standard
Another interesting fact is that
Most (or even all) of the high performance BLAS implementations are NOT implemented in Fortran. ATLAS is implemented in C. GotoBLAS/OpenBLAS is implemented in C and its performance critical parts in Assembler. Only the reference implementation of BLAS is implemented in Fortran. However, all these BLAS implementations provide a Fortran interface such that it can be linked against LAPACK (LAPACK gains all its performance from BLAS).
Many numerical software applications use BLAS-compatible libraries to do linear algebra computations, including some that you may be familiar with: Mathematica, MATLAB, NumPy, R, and Julia.
LAPACK
LAPACK stands for Linear Algebra PACKage and provides routines for solving systems of simultaneous linear equations, least-squares solutions of linear systems of equations, eigenvalue problems, and singular value problems. Additionally, it provides matrix factorizations and handling of dense and banded matrices.
LAPACK was originally written in FORTRAN 77, but moved to Fortran 90 in version 3.2 in 2008. It provides efficient and portable routines by relying on efficient BLAS implementations provided for specific machines. By doing so, BLAS forms a low-level interface between LAPACK and different machine architectures.
There are many libraries and tools for scientific and numerical computing that are built on top of LAPACK, for example: R, Matlab, SciPy etc.
OpenBLAS
OpenBLAS is an open source BLAS library forked from the GotoBLAS2 -1.13 BSD version, since GotoBLAS is no longer being maintained. The GotoBLAS2 is an open source implementation of the BLAS API with many optimizations for specific processor types. What is important is that the OpenBLAS provides the standard BLAS and LAPACK functions with some extensions popularized by Intel's MKL.
Since OpenBLAS enables the inclusion of LAPACK routines, it is advised to compile OpenBLAS and then link it to SIESTA. See SIESTA - User's Guide - 4.1.5 - page 15, link in Resource section.
To get OpenBLAS, we can go to the GitHub's repository xianyi/OpenBLAS and get the newest release - 0.3.21, at the time of writing.
wget https://github.com/xianyi/OpenBLAS/releases/download/v0.3.21/OpenBLAS-0.3.21.tar.gz
tar xvf OpenBLAS-0.3.21.tar.gz
If you want, you can create a build folder and instruct make to install
the OpenBLAS libraries in it using PREFIX flag, otherwise it will default to
/opt/OpenBLAS.
One important thing to keep in mind is that if our application is already multi-threaded, it will conflict with OpenBLAS multi-threading. Therefore, we need to build OpenBLAS in a single thread version.
For more information, please see OpenBLAS Multi-Threaded - FAQ, and bgeneto/build-install-compile-openblas GitHub repository.
mkdir <path>/openblas
cd OpenBLAS-0.3.21
make DYNAMIC_ARCH=0 CC=gcc FC=gfortran \
  HOSTCC=gcc BINARY=64 INTERFACE=64 \
  NO_AFFINITY=1 NO_WARMUP=1 USE_OPENMP=0 \
  USE_THREAD=0 USE_LOCKING=1 LIBNAMESUFFIX=nonthreaded
make PREFIX=<path>/openblas LIBNAMESUFFIX=nonthreaded install
After it's done, you should see libopenblas_nonthreaded.a,
libopenblas_nonthreaded.so, and libopenblas_nonthreaded.so.0 in
<path>/openblas/lib directory. Later, we will use this path to instruct
SIESTA where to look for OpenBLAS libraries using
LIBS += -L/<path>/openblas/lib -lopenblas.
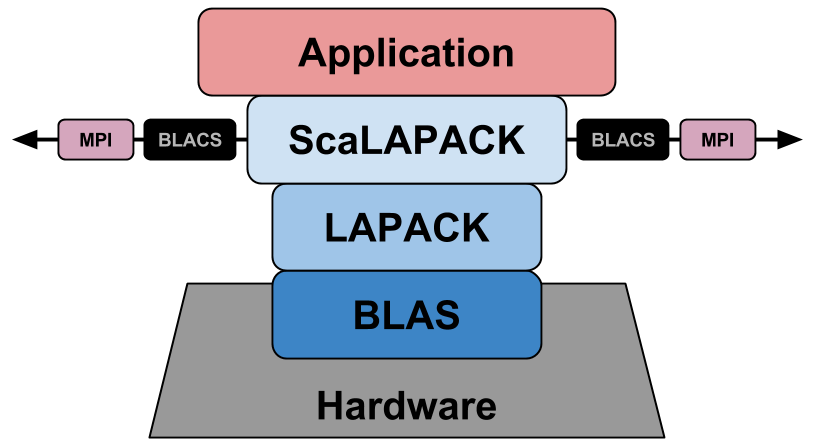
ScaLAPACK
ScaLAPACK stands for Scalable LAPACK, and as the name suggests, it is a library of high-performance linear algebra routines that are a subset of LAPACK routines redesigned for distributed memory MIMD parallel computers. The library is written in Fortran, with some auxiliary routines written in C.
Since this is a parallel and distributed solution, it depends on:
- BLACS (Basic Linear Algebra Communication Subprograms) library - which is a project whose purpose is to create a linear algebra oriented message passing interface that may be implemented efficiently and uniformly across a large range of distributed memory platforms
- PBLAS (Parallel Basic Linear Algebra Subprograms) which is an implementation of BLAS for distributed memory architectures
Fortunately, ScaLAPACK's code base directly includes PBLAS and BLACS so we don't have to worry about that.
Having all of this in mind, we can finally get a clearer picture of how everything is interconnected:
To install ScaLAPACK, we can use the ScaLAPACK Installer for Linux, which is a simple python2 script that downloads, compiles, installs, and tests all the libraries needed for ScaLAPACK.
wget http://www.netlib.org/scalapack/scalapack_installer.tgz -O ./scalapack_installer.tgz
tar xf ./scalapack_installer.tgz
Now, we can download the newest ScaLAPACK manually or let the installer
download it automatically. If you want a specific version, download it from
Reference-ScaLAPACK/scalapack - Releases
repository, and place it under scalapack_installer/build/download as
scalapack.tgz.
Run the installer with the following arguments:
./setup.py --prefix <path>/scalapack \
  --blaslib=<path>/openblas/lib/libopenblas_nonthreaded.a \
  --lapacklib=<path>/openblas/lib/libopenblas_nonthreaded.a \
  --mpibindir=/usr/local/lib \
  --mpiincdir=/usr/local/include
If you are using GCC v10 or above, you'll most likely experience
errors with rank mismatch between actual arguments. That happens since as
of version 10 GCC brings stricter type checking for Fortran procedure
arguments. This can sometimes cause issues with MPI libraries. To convert
errors into warnings, we can use -fallow-argument-mismatch flag and set it
using --fcflags=-fallow-argument-mismatch.
When you get asked:
Which BLAS library do you want to use ?
- b : BLAS library you requested:
<path>/openblas/lib/libopenblas_nonthreaded.a- l : LAPACK library you provided:
<path>/openblas/lib/libopenblas_nonthreaded.a
Select the first one i.e. b.
The testing part can take ages, depending on your machine, so be patient.
If you want to skip tests use --notesting.
SIESTA
Now that we have required libraries compiled and ready, we can build SIESTA manually. Go to their GitLab repository and download the latest release - SIESTA Releases, which is 4.1.5 at the time of writing.
wget https://gitlab.com/siesta-project/siesta/-/releases/v4.1.5/downloads/siesta-4.1.5.tar.gz
tar xvzf siesta-4.1.5.tar.gz
Before we start compiling SIESTA, we will set up some additional libraries.
Flook
If we want to control SIESTA via the LUA scripting language, we can do that using Flook library that allows us to do advanced molecular dynamics simulations, among many other things, without changing any code in SIESTA.
Before installing Flook, we need GNU Readline library
yum install -y readline-devel
To install Flook, we can use SIESTA's installation script located at
siesta-4.1.5/Docs/install_flook.bash.
cd <path>/siesta-4.1.5/Docs
./install_flook.bash
NetCDF
The NetCDF stands for Network Common Data Form, and is a set of libraries and machine-independent data formats that support the creation, access, and sharing of array-oriented scientific data.
As of version 4.0 NetCDF allows the use of HDF5 data format, which is designed to store and organize large amounts of data allowing NetCDF to perform more advanced IO.
SIESTA provides a script that installs NetCDF with HDF5 located at
siesta-4.1.5/Docs/install_netcdf4.bash, but before running it we need to
install
m4
library.
yum install -y m4
Be aware that the script has hardcoded version for zlib, hdf5, netcdf-c, and netcdf-fortran. Before running the script, make sure that the latest versions are set and the download URLs are correctly defined.
When everything is set and ready, run the script
./install_netcdf4.bash
This can take a while, so grab your coffee ☕
Build
We can either build in Obj folder or create a build directory. Using Src
directory is explicitly prohibited, as specified in
Building SIESTA manually.
To configure the build we have to create an arch.make file. This file
contains all the parameters, library paths, and compiler flags that allow us to
tune build for specific needs. Since this configuration depends on your
specific use case, you should always refer to SIESTA's User Manual for more
details. To get a sense of how an arch.make file looks like, check out the
template example provided by the DOCUMENTED-template.make in the Obj
directory.
Since we are building with GCC and OpenMPI, there is already a nice example
of an arch.make file provided in
bgeneto/siesta-gcc-mpi
GitHub repository. If you take a look at the example, you should see sections
for each library that we've installed. Of course, the library paths and
versions are completely different in your case, so don't forget to change that.
Configuring a parallel build can be tricky since it depends on many factors, what kind of parallelism we want, how large is the system, how many cores we have, do we want to build with OpenMP only or enable hybrid parallelism using both MPI and OpenMP etc. For more details check out SIESTA's manual and the aforementioned GitHub repository.
Next step is to run obj_setup.sh script that makes the information about
the source tree available within the build directory, this will populate the
build directory with the minimal scaffolding of makefiles, as specified in the
User's Manual - Page 11.
sh ../Src/obj_setup.sh
Running make clean will confirm that the configuration is valid and then
you can run make which will compile SIESTA executable.
make clean
make OBJDIR=Obj
If everything went well, you should see the executable siesta. Running it
should give you something like the following
Siesta Version  : 4.1.5
Architecture    : x86_64_MPI
Compiler version: GNU Fortran (GCC) 12.2.0
Compiler flags  : mpif90 -O3 -fPIC -ftree-vectorize -march=native -fallow-argument-mismatch
PP flags        : -DFC_HAVE_ABORT -DMPI -DSIESTA__FLOOK -DCDF -DNCDF -DNCDF_4
Libraries       :  libfdict.a libncdf.a libfdict.a  -lflookall -ldl -lnetcdff -lnetcdf -lhdf5_hhl -lhdf5 -lz -lopenblas_nonthreaded -lscalapack
PARALLEL version
NetCDF support
NetCDF-4 support
Lua support

* Running in serial mode with MPI
>> Start of run:   2-OCT-2022  18:01:42

                           ***********************
                           *  WELCOME TO SIESTA  *
                           ***********************

reinit: Reading from standard input
reinit: Dumped input in INPUT_TMP.49413
Building different utilities is simple as running make in the directory of a
specific tool under <path>/siesta-4.1.5/Util. The makefile in the directory
uses the main Obj/arch.make file, so what you have configured for building
SIESTA will be also used for build the utility tools.
To build TBTrans, go to <path>/siesta-4.1.5/Util/TS/TBtrans and run make,
this will create an executable tbtrans
TBtrans Version: 4.1.5
Architecture  : x86_64_MPI
Compiler flags: mpif90 -O3 -fPIC -ftree-vectorize -march=native -fallow-argument-mismatch
PP flags      : -DFC_HAVE_ABORT -DMPI -DSIESTA__FLOOK -DCDF -DNCDF -DNCDF_4 -DTBTRANS
Libraries     :  libfdict.a libncdf.a libfdict.a  -lflookall -ldl -lnetcdff -lnetcdf -lhdf5_hhl -lhdf5 -lz -lopenblas_nonthreaded -lscalapack
PARALLEL version
NetCDF support
NetCDF-4 support

* Running in serial mode with MPI
>> Start of run:   2-OCT-2022  18:05:55

                           ************************
                           *  WELCOME TO TBtrans  *
                           ************************

reinit: Reading from standard input
The same goes for other utility tools.
Resources
- Wikipedia - Basic Linear Algebra Subprograms
- Netlib - The BLAS as the Key to Portability
- Netlib - LAPACK — Linear Algebra PACKage
- Netlib - ScaLAPACK — Scalable Linear Algebra PACKage
- SIESTA - User's Guide - 4.1.5