Nginx Reverse Proxy and Lua Scripting
TABLE OF CONTENTS
- 1.Introduction#introduction
- 2.Lua#lua
- 3.OpenResty®#openresty
- 4.Playground#playground
- 5.Modifying Headers#modifying-headers
- 5.1.Clearing and Setting Values#clearing-and-setting-values
- 5.2.Dynamic Header Values#dynamic-header-values
- 6.Modifying Body#modifying-body
- 6.1.Clearing and Setting Body#clearing-and-setting-body
- 6.2.Dynamic Body#dynamic-body
- 7.Custom Lua Modules#custom-lua-modules
- 8.Resources#resources
Introduction
Recently, I've had the opportunity to work on a very interesting topic. The
objective was to modify HTTP requests at the proxy level, as we lacked control
over both the source and destination services. I've configured Nginx as a
reverse proxy many times, so setting it up was straightforward. After brief
research I've found that I can use Lua scripting to write some custom code
using ngx_http_lua_module which embeds the power of Lua into Nginx HTTP Servers.
This module is not distributed with Nginx source but is a core component of OpenResty®.
Using Lua together with Nginx allows us to:
- perform arbitrary complex access control and security checks in Lua before requests reach the upstream backends
- manipulate request headers and body using a custom Lua code within Nginx
- fetching information in-flight from different storage backends before processing the request
- implementing custom logic for caching mechanisms within Nginx using Lua
and many more. We have endless possibilities thanks to our ability to utilize custom Lua code for achieving our desired outcomes.
Lua
It was my first time using Lua, leading me to invest time in exploring and understanding the language.
The motivation for the language is quite interesting. It was created in 1993 by members of the Computer Graphics Technology Group at the Pontifical Catholic University of Rio de Janeiro, in Brazil. It was developed to be extremely lightweight, simple, and portable. The motivation for the language arose from the need for a flexible and efficient scripting language that could be easily integrated into various applications. This is achieved by making Lua cross-platform by writing the interpreter of compiled bytecodes in ANSI C, and implementing a simple C API which can be easily embedded into different applications.
Over the years, Lua gained popularity in many industries, particularly in the gaming industry, notably for its simplicity, flexibility, and portability, making it a preferred choice for scripting in video games. If you've ever used a user-created modification or scenario in games like Roblox, World of Warcraft, Dota 2, etc., chances are it's built using Lua scripting.
Lua can be also embedded in any other application as well. In this post we'll focus on how to use Lua scripting with Nginx. The OpenResty® project provides an enhanced version of Nginx together with embedded LuaJIT and many other Lua libraries.
If you'd like to get a quick grasp of some Lua basics, I suggest the following YouTube video
OpenResty®
As stated on the official OpenResty® website
OpenResty® is a full-fledged web platform that integrates our enhanced version of the Nginx core, our enhanced version of LuaJIT, many carefully written Lua libraries, lots of high quality 3rd-party Nginx modules, and most of their external dependencies. It is designed to help developers easily build scalable web applications, web services, and dynamic web gateways
OpenResty® is not an Nginx fork, it's a higher level application and gateway platform that uses Nginx as a component. It constantly imports the latest features and bug fixes from official Nginx, LuaJIT, and other 3rd party repositories keeping it up-to-date. We can also develop our own Lua modules and use it directly in Nginx, check Custom Lua Modules for more information.
The main building blocks of scripting custom Lua code within Nginx are Directives. The directives are used to define the timing of custom Lua code execution and how the result will be used.
For example, the directive init_by_lua_block is executed when a new Lua VM
is created. This block won't be executed upon every request if the caching mode
is turned on, which allows us to preload the Lua modules in Lua VM. It will
leverage
Copy-on-write
making it more memory efficient.
init_by_lua_block { require "cjson" }

server {
    location = /api {
        content_by_lua_block {
            -- the following require() will just return
            -- the already loaded module from package.loaded:
            ngx.say(require "cjson".encode{dog = 5, cat = 6})
        }
    }
}
This example has been taken from init_by_lua_block
Another very important directive is access_by_lua_block. This directive
will execute the Lua code, provided in the block, for every request. It runs
during the Rewrite/Access phase allowing us to access and rewrite the request.
Using this directive we can modify the request headers and body, among many
other things.
See examples provided in Modifying Headers and Modifying Body sections for more information on how to use this directive.
The following diagram represents the order of directives
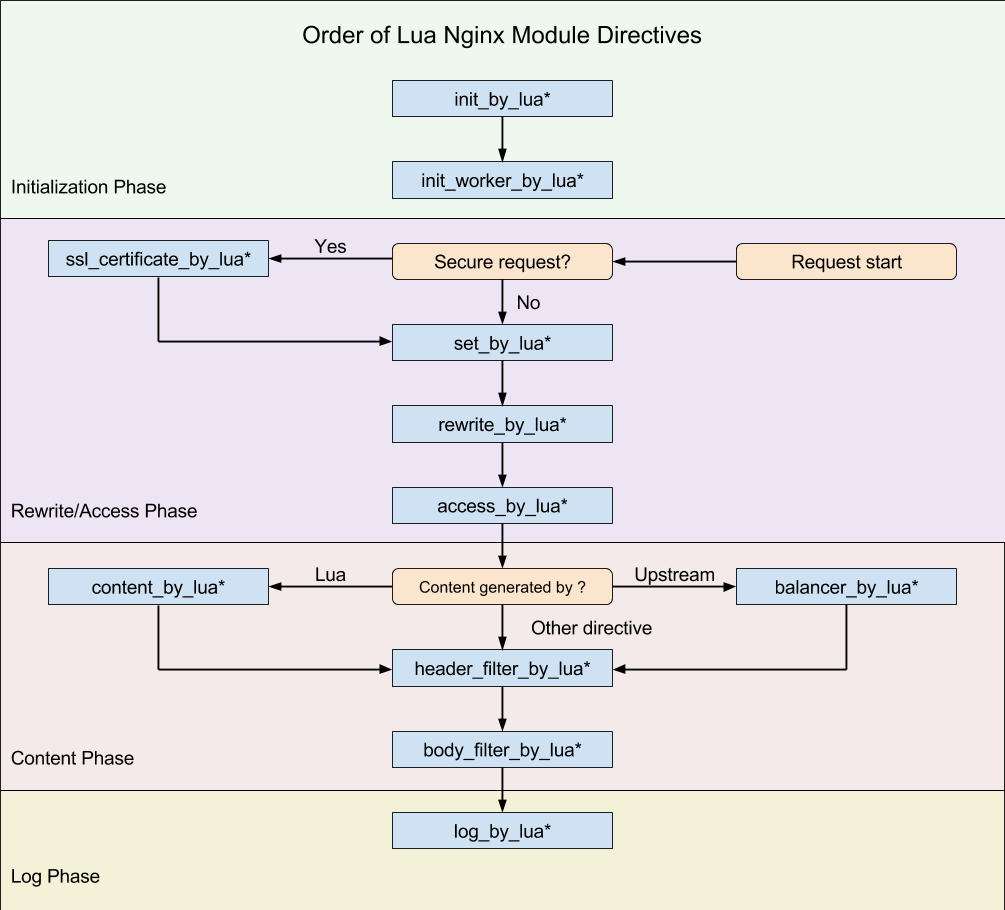
Image Source: Directives
Make sure to explore the official website OpenResty® and lua-nginx-module repository for a deeper dive into how OpenResty® incorporates Lua with Nginx
Playground
In order to demonstrate how we can modify requests in-flight we'll create an Nginx proxy server using OpenResty® and set up a simple local environment to play around with its configuration.
You can install official prebuilt packages for some of the common Linux distributions, or build it from source on your own. Please see Installation for more information.
However, I find it easier to just spin up a Docker container and configure Docker bridge network in order to use proxy server together with a local test API which will serve as a proxy destination.
Fortunately, OpenResty® already provides everything that's needed for running OpenResty® in a Docker container. Repository docker-openresty is quite extensive and specifies how we can build our own Docker image with different configurations depending on the use case.
As a simple test, we'll just pull a prebuilt image from a Docker Hub openresty/openresty and use docker compose to set the bridge network configurations.
The idea here is to have an OpenResty® running in a docker container and serving as a proxy to our test API running in the localhost. By doing this, we can send requests to the proxy, make modifications, and inspect them on the test API's end.
The implementation of test API is not important here, but if you want a simple and fast solution I propose FastAPI. The following two files is everything we need to start playing around
# app.py
from fastapi import FastAPI, Request


app = FastAPI()


@app.post("/")
async def root(request: Request):
    request_body = await request.json()
    request_headers = request.headers
    return {
        "body": request_body,
        "headers": request_headers,
    }
# main.py
import uvicorn
from app import app


if __name__ == "__main__":
    uvicorn.run(
        "main:app",
        port=8000,
        host="172.17.0.1",
        reload=True
    )
Next, we need to configure OpenResty® service. You can do it directly on the command line or using a compose yml, the result should be the same. Two parameters are important:
volumes- Create thetemplatesfolder and placenginx.confin it. This folder will be mounted asconf.d, overwriting the default Nginx configuration. Doing so, we can play around with Nginx's configuration without entering the running Docker containerextra_hosts- The Docker daemon supports a specialhost-gatewayvalue which resolves to the host's gateway IP and lets containers connect to services running on the host. Addinghost.docker.internal:host-gatewayasextra_hosts(or--add-hostif specified on the command line) corresponds to an entry with the IP address and hostname in/etc/hostsinside containers for this service i.e. it will know how to resolve the IP and reach our localhost.
services:
  proxy:
    image: openresty/openresty
    ports:
      - 8080:80
    volumes:
      - ./templates:/etc/nginx/conf.d
    extra_hosts:
      - "host.docker.internal:host-gateway"
Place the following content in nginx.conf file in templates folder
server {
    listen 80;

    location / {
        default_type application/json;
        proxy_pass http://host.docker.internal:8000;
    }
}
After running API and Docker compose up, try to send a request to OpenResty® service i.e. Nginx:
curl -X POST -d '{"a": "c"}' http://localhost:8080
You should see a request going to reverse proxy
proxy-1 | 172.27.0.1 - - [09/Apr/2024:10:46:03 +0000] "POST / HTTP/1.1" 200 200 "-" "curl/8.5.0"
Then to API
INFO: 172.27.0.2:39870 - "POST / HTTP/1.0" 200 OK
and response coming back as
{"body":{"a":"c"},"headers":{"host":"host.docker.internal:8000","connection":"close","content-length":"10","user-agent":"curl/8.5.0","accept":"*/*","content-type":"application/x-www-form-urlencoded"}}
Note: Local IPs will be different in your case. Check the Docker gateway
and modify the uvicorn host, if needed.
Now that we have everything up and running, we can start playing around with Lua scripting in Nginx.
Modifying Headers
Clearing and Setting Values
Modifying headers using Lua can be easily implemented by extending the
nginx.conf and defining access_by_lua_block. As mentioned before, this will
allow us to access and rewrite the request.
We can read and write Nginx variable values by simple referencing
ngx.var.some_nginx_variable_name inside the Lua block.
For example ngx.var.request_method gives us access to the request method.
The following configuration checks if the request method is POST, clears the
user-agent header value, and sets a custom test value.
server {
    listen 80;

    location / {
        default_type application/json;
        access_by_lua_block {
            if ngx.var.request_method == "POST" then
                ngx.req.clear_header("user-agent")
                ngx.req.set_header("test", "123")
            end
        }
        proxy_pass http://host.docker.internal:8000;
    }
}
If you compare the response with the previous example, you'll see that
user-agent value is no longer present and we have "test":"123" in header.
Dynamic Header Values
Hardcoding the header values is fine, but we can do it dynamically by sending header values inside a body request.
First we need to parse the request body, gather values, and then modify the
header. Body parsing is done using cjson, Lua module which implements a fast
JSON encoding/parsing module for Lua.
Before we define server we should preload the cjson module, as
aforementioned. Even if we use require "cjson" later in the Lua block it will
be preloaded, so it will be only retrieved, not loaded again.
In order to get request body data we use ngx.req.get_body_data(). However,
we should be careful since this function may return nil if the request
body has not been read. To avoid this, we use ngx.req.read_body() which
forces the module to read the body before we try to access it.
We can also turn on lua_need_request_body which will read the body by
default. Please not that this is not recommended. The OpenResty® suggest using
ngx.req.read_body and ngx.req.discard_body for finer control over the
request body reading process instead. Check
lua_need_request_body for more details.
Finally, we can parse the request body and loop over header values that we want to remove.
init_by_lua_block { require "cjson" }

server {
    listen 80;

    location / {
        default_type application/json;
        access_by_lua_block {
            if ngx.var.request_method == "POST" then
                local cjson = require "cjson"
                ngx.req.read_body()
                local body = cjson.decode(ngx.req.get_body_data())

                for k,v in pairs(body["remove_headers"]) do
                    ngx.log(ngx.ERR, "Clearing header " .. v)
                    ngx.req.clear_header(v)
                end
            end
        }
        proxy_pass http://host.docker.internal:8000;
    }
}
Note that I used ngx.ERR for logging. This is fine since we are playing
around, but in real-world application you'd implement a comprehensive logging
using ngx.errlog Lua module. Check
lua-resty-core.ngx.errlog
for some guidelines.
Obviously, in the same fashion, we could specify add_headers values in a request
body, loop over them, and add them using ngx.req.set_header(<key>, <value>).
The possibilities are endless, depending entirely on your objectives and the
requirements you need to fulfill.
There are many other function for request manipulation, check the full list Nginx API for Lua and try something out.
Modifying Body
Clearing and Setting Body
Straight-forward example is to just drop the whole body or set something new.
This could be easily done using ngx.req.discard_body() and
ngx.req.set_body_data().
However, there's a little catch. The ngx.req.discard_body() discards the body
immediately when the data is read on the connection. If we use it after
the ngx.req.read_body() this function does nothing and returns immediately.
In the same fashion, if we use ngx.req.read_body() after we discard the body
the read function does nothing and returns immediately. Therefore, either we
discard the body completely or use it for further processing.
Similarly, ngx.req.set_body_data() can work only if read the body using
ngx.req.read_body() and we don't discard the body before using it.
The following block reads the body and replaces it with a hardcoded example.
init_by_lua_block { require "cjson" }

server {
    listen 80;

    location / {
        default_type application/json;
        access_by_lua_block {
            if ngx.var.request_method == "POST" then
                local cjson = require "cjson"
                ngx.req.read_body()

                local data = { a = 1, b = "2" }
                local body = cjson.encode(data)
                ngx.req.set_body_data(body)
            end
        }
        proxy_pass http://host.docker.internal:8000;
    }
}
Dynamic Body
Since we can read all the request parameters, we could also extract, modify, enrich, and construct a new body.
For example, concatenating body values and extracting values from headers
init_by_lua_block { require "cjson" }

server {
    listen 80;

    location / {
        default_type application/json;
        access_by_lua_block {
            if ngx.var.request_method == "POST" then
                local cjson = require "cjson"
                ngx.req.read_body()
                local body = cjson.decode(ngx.req.get_body_data())
                local headers = ngx.req.get_headers()

                ngx.req.discard_body()

                local data = {
                    c = body["a"] + body["b"],
                    method = ngx.var.request_method,
                    host = headers["host"]
                }
                local new_body = cjson.encode(data)
                ngx.req.set_body_data(new_body)
            end
        }
        proxy_pass http://host.docker.internal:8000;
    }
}
This example can be extended by issuing a synchronous but non-blocking Nginx
subrequest using ngx.location.capture() to get additional data from other
local Nginx locations:
res = ngx.location.capture('/foo/bar?a=3&b=4')
Keep in mind that this is not ordinary HTTP/TCP request, everything is happening internally, on C level.
If we want to make actual HTTP requests to external services, we would use lua-resty-http which implements Lua HTTP client cosocket driver for OpenResty® / ngx_lua.
local httpc = require("resty.http").new()
local res, err = httpc:request_uri("http://www.example.com", {method="GET"})
Note: Be aware that you need to set resolver which will configure name
servers used to resolve names of upstream servers into addresses. Please
see resolver
for more information.
Custom Lua Modules
As our Lua code block gets bigger, its maintainability decreases. In that case, we prefer to divide the block into several custom Lua modules.
Before we start requesting a Lua module, we need to define the path that will be
searched. This is done using lua_package_path, before we define the Lua code
block.
lua_package_path "$prefix/lua/?.lua;;";
The $prefix is used in the search path string to indicate the path of the
server prefix usually specified using -p PATH command-line option while
starting the Nginx server.
Since we are working with OpenResty® docker image and we use docker compose,
we should create a lua folder, just like templates, mount it as additional
volume and define the search path for $prefix. For simplicity's sake, we'll
just set it to the root.
Compose yml now looks like:
services:
  proxy:
    image: openresty/openresty
    ports:
      - 8080:80
    volumes:
      - ./templates:/etc/nginx/conf.d
      - ./lua:/custom-lua
    extra_hosts:
      - "host.docker.internal:host-gateway"
where ./lua is a folder, next to templates, which contains process.lua
file with the following content
local cjson = require "cjson"
local _M = {}

function _M.get_remove_headers()
    ngx.req.read_body()
    local body = cjson.decode(ngx.req.get_body_data())
    return body["remove_headers"]
end

function _M.remove_headers(headers)
    for k,v in pairs(headers) do
        ngx.req.clear_header(v)
    end
end

function _M.set_response_body()
    local data = { result = "SUCCESS" }
    local body = cjson.encode(data)
    ngx.req.set_body_data(body)
end

return _M
This module contains get_remove_headers, remove_headers, and
set_response_body functions. Just like we did in the previous example, but
now in a dedicated Lua module.
Finally, nginx.conf looks like
lua_package_path "/custom-lua/?.lua;;";
init_by_lua_block { require "process" }

server {
    listen 80;

    location / {
        default_type application/json;
        access_by_lua_block {
            local process = require "process"

            remove_headers = process.get_remove_headers()
            process.remove_headers(remove_headers)
            process.set_response_body()
        }
        proxy_pass http://host.docker.internal:8000;
    }
}
If you run the following curl
curl -X POST -d '{"remove_headers": ["user-agent", "accept", "content-type"]}' http://localhost:8080
The response should be
{"body":{"result":"SUCCESS"},"headers":{"host":"host.docker.internal:8000","connection":"close","content-length":"20"}}
Clearly, this represents a significantly cleaner and more maintainable approach. I haven't delved into error handling in this instance, as this post presents straightforward examples and serves solely as an experiment. However, organizing the code into distinct modules will facilitate the development of robust and maintainable software if you are building a real-world application.
If this is your first time playing with Lua in Nginx, I hope this post gave you a nice introduction of what's possible and how to get started. As you can see, the possibilities are endless and all comes down to what you actually want to accomplish.
The documentation on the OpenResty® official website and GitHub repositories is pretty extensive and detailed. There are tons of examples and guidelines on how to build dynamic and scalable web services using Lua with Nginx. Definitely give it a look, and enjoy coding in Lua!