PGAS and Coarray Fortran
TABLE OF CONTENTS
- 1.Introduction#introduction
- 2.Partitioned Global Address Space#partitioned-global-address-space
- 2.1.Concept#concept
- 2.2.Languages#languages
- 3.Coarray Fortran#coarray-fortran
- 3.1.Image#image
- 3.2.Coarray#coarray
- 4.Local Setup#local-setup
- 5.Hello World#hello-world
- 6.Number of images#number-of-images
- 7.Synchronization#synchronization
- 7.1.sync all#sync-all
- 7.2.sync images#sync-images
- 8.Examples#examples
- 8.1.Read from an image#read-from-an-image
- 8.2.Swapping values between images#swapping-values-between-images
- 9.Resources#resources
Introduction
Throughout my studies I was involved in several science projects that used large clusters for numerical analysis. One of them used the Spanish Initiative for Electronic Simulations with Thousands of Atoms (SIESTA) program which performs efficient electronic structure calculations and ab initio molecular dynamics simulations of molecules and solids. SIESTA is written in Fortran95 and offers highly efficient parallelization.
This wasn't the first time that I came across Fortran but it was definitely the first time I realized how powerful Fortran is for parallelization and numerical analysis.
Fortran first appeared in 1957 and if you come from the industry, it may be hard to wrap your head around the fact that it's still used in 2022. Moreover, Fortran is still a dominant language for things like hydrodynamics, large scale molecular dynamics, electronic structure calculations, large scale climate models etc.
To quote Charles Anthony Richard Hoare:
I don't know what the programming language of the year 2000 will look like, but I know it will be called FORTRAN.
Ref: Source
Of course, things have changed, but for large scale simulation of physical systems, Fortran still stays strong and there are many reasons why that is the case:
- Why physicists still use Fortran
- ArsTchnica - Scientific computing's future: Can any coding language top a 1950s behemoth?
The aim of this article is to give a brief introduction to parallelization using Fortran by introducing and explaining concepts on a high level. Additionally, you can use the Local Setup to build a docker image and quickly experiment with some code and Examples.
Partitioned Global Address Space
Concept
When we think about parallel processing the first thing that pops up in our mind is multiple independent processes that access data and also communicate with each other.
We can roughly divide types of interactions based on the mechanism by which parallel processes are able to communicate with each other:
- Shared Memory - In this model, parallel processes share a global memory which they can asynchronously access to read and write data. This, of course, brings some specific difficulties such as race conditions which give rise to the concept of [locks] that control the access and so on.
- Message Passing - In the message-passing model, parallel processes do not share memory. All data is local to the process. They use messages between each other to exchange the data. This exchange can be synchronous or asynchronous between a sender and a receiver depending on the implementation.
- Partitioned Global Address Space - PGAS is something in between, a global space is partitioned so that each process has a local data but also access to the shared memory which allows exchange of data between different parallel processes.
The following picture perfectly illustrates the differences between these models:
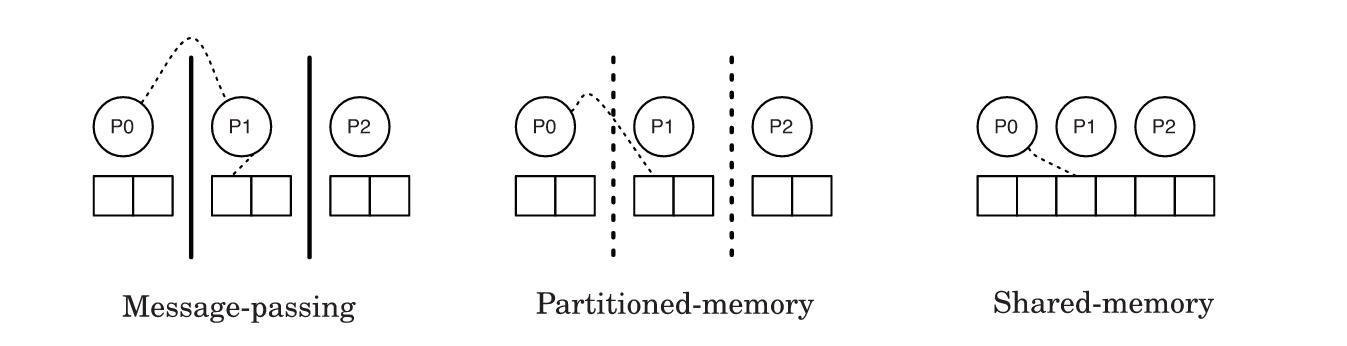
Image Source: Partitioned Global Address Space Languages Paper [1] - See Resources Section
Conceptually, the partitioned-memory model can be imagined as a single shared memory which is partitioned at the hardware level. Think of several memories that are interconnected to build one shared space. This sharing can be implemented in multiple ways, for example if we have clusters of racks, the shared space can be managed using network devices or through cache coherence. On the other hand, each processor has attached storage that is considered local, but can also be a part of the global shared space.
In such a structure, different parts of the shared memory have different access latencies. That's why PGAS distinguishes between local and remote data access.
Languages
There are multiple programming languages that implement the PGAS model, such as:
- Unified Parallel C - is an extension of C programming language designed for high-performance computing on large-scale parallel machines. It extends the concept of arrays and pointers so they can be shared between processors
- Split-C - is a parallel-extension of C programming language that acknowledges the latency of remote access by allowing split-phase, or non-blocking, transactions. If you want to learn more, please see: Parallel Programming in Split-C
- X10 - is described as a modern object-oriented programming language providing an asynchronous PGAS programming model
- Chapel - allows object-oriented concepts and generic programming. It supports both task and data-driven parallelism while enabling separation of algorithm and data structure details.
Where is Fortran in all of this?
Well, if we are mentioning the history of PGAS languages, we have to bring up the fact that Fortran was at the forefront of PGAS development and implementation.
In 1993, an extension of Fortran90 with constructs that support parallel computing emerged and was called High Performance Fortran. HPF has some characteristics of PGAS-like languages but was never explicitly described as a PGAS language since it was released even before the term PGAS existed. The idea behind HPF is that it's a data-parallel language for distributed parallel computers. It unified the concepts of older languages, such as:
- FortranD (1988) - Fortran D Language Specification
- Vienna Fortran (1988) - A Fortran Language Extension for Distributed Memory Multiprocessors
- CM Fortran (1991) - PDF: CM Fortran Programming Guide - Thinking Machines Corporation
If you are interested in the history of High Performance Fortran, read the following paper: The rise and fall of High Performance Fortran: an historical object lesson
After HPF came along Co-Array Fortran (CAF) which is a parallel extension of Fortran95 that adds the coarray object as a new concept to the language. The original paper that introduced the coarray was published in 1998 Co-array Fortran for parallel programming. But the extension was formally introduced to the Fortran Standard in 2008 after WG5 committee's review Co-arrays in the next Fortran Standard.
Coarray Fortran
There are two main concepts in Coarray Fortran:
Image
An image is a parallel process that is executed independently. Each images is basically a copy of a program and has its own local memory. In other words, images follow Single Program, Multiple Data (SPMD) model. The logic within a single program determines the workload for each image, as you will see in the Examples section.
Execution of images is independent i.e. each image runs on its own in parallel to the other images. However, there are cases when one process depends on the result of another and if we are doing them in parallel i.e. on different images, we have to have a way to tell one image to way for the other. That process is called synchronization.
The process of synchronization is described in detail in the section below: Synchronization.
Coarray
The concept of the coarray may be confusing. Even though it has the word array in it, we can also define a scalar coarray:
integer :: i[*]
or alternatively:
integer, codimension[*] :: i
The idea here is that each image will have a copy of the variable i but the
codimension defines where the value belongs i.e. on which image. The asterisk
* is important since it dynamically takes the number of images as a value.
To illustrate, let's say that we have a coarray that's also an array:
integer :: i(2)[*]
If we use 3 images, this will allocate 6 elements which form the coarray i.

Coarray depiction
Using i(1) will reference different elements in the coarray depending on
which image we execute it. However, if we use i[1](1) on image 2, we are
specifying the codimension and that will actually take the value which is not
local to the image 2 i.e. it will access remote data on the image 1.
Take a look at examples Read from an image and Swapping values between images to get a better idea of how it works in action.
Local Setup
To experiment with coarrays we need a coarray-capable compiler. The GNU Fortran compiler supports coarrays through the OpenCoarrays project.
OpenCoarrays is an open-source software project that produces an application binary interface (ABI) used by the GNU Compiler Collection (GCC) Fortran front-end to build executable programs that leverage the parallel programming features of Fortran 2018.
The OpenCoarrays enables gfortran to support Fortran's parallel programming
features without making direct reference to the back-end communication
library. In other words, we can specify other underlying communication
libraries without costly refactoring.
The local setup depends on your machine and OS. I'm running Arch-based distribution (Manjaro) and I had some issues with libraries. So, to make things easier for everyone I've made a simple bash script, for Debian-based distributions, that installs everything that we need in order to run Coarray Fortran:
# installation.sh
apt update
apt-get -y install \
	software-properties-common \
	build-essential \
	curl \
	wget \
	git \
	gcc \
	lsb-release \
	libmpich-dev \
	libcoarrays-mpich-dev \
	libopenmpi-dev \
	libcoarrays-openmpi-dev \
	libcoarrays-dev

# Install latest cmake
wget -O - https://apt.kitware.com/keys/kitware-archive-latest.asc 2>/dev/null | gpg --dearmor - | tee /etc/apt/trusted.gpg.d/kitware.gpg >/dev/null
apt-add-repository 'deb https://apt.kitware.com/ubuntu/ focal mmain'
apt update
apt install -y cmake

# Install OpenCoarrays
cd /opt
git clone https://github.com/sourceryinstitute/OpenCoarrays.git
cd OpenCoarrays
mkdir opencoarrays-build
cd opencoarrays-build
export FC=/usr/bin/gfortran
export CC=/usr/bin/gcc
cmake /opt/OpenCoarrays -DCMAKE_INSTALL_PREFIX=/opt/OpenCoarrays/opencoarrays-install
make
make install
ln -s /opt/OpenCoarrays/opencoarrays-install/bin/caf /usr/local/bin/caf
ln -s /opt/OpenCoarrays/opencoarrays-install/bin/cafrun /usr/local/bin/cafrun
You can use this script to build a docker image:
FROM ubuntu:focal
ARG DEBIAN_FRONTEND=noninteractive
ARG TZ=Europe/London

COPY ./installation.sh .
RUN chmod +x ./installation.sh
RUN ./installation.sh

RUN useradd -ms /bin/bash coarray
USER coarray
WORKDIR /home/coarray
Running this image allows us to easily experiment with coarrays using the following commands:
caf- for compiling. Example:caf test.f90 -o program, whereprogramis the name of the output.cafrun- for running. Example:cafrun -n 4 ./program, where-ndefines the number of parallel processes.
Hello World
As we already know the concept of an image is the center concept of coarrays. Each image runs in parallel until it completes, by doing so it works completely independently of other images.
There are two important built-in functions:
num_images()- Gives the number of images that are being usedthis_image()- Returns the number of a specific image i.e. the index of the invoking image
The simplest example of these two functions:
! test.f90
program main
  implicit none
  write (*,*) "Hello from image", this_image(), "of", num_images()
end program main
Compile this using caf test.f90 -o a and run it using cafrun -n 4 ./a.
You'll see something like:
Hello from image           2 of           4
Hello from image           4 of           4
Hello from image           3 of           4
Hello from image           1 of           4
Of course, this output depends on the number of images you've specified using
-n 4.
Number of images
If you are using unix-like system you can check the CPU information using
cat /proc/cpuinfo. Depending on the number of your CPU cores the
argument -n X can take different values.
In my case, using the docker image from above, I have 4 CPU cores. Running
the code with a smaller number of images e.g. cafrun -n 3 is completely
fine but if I try a bigger number e.g. cafrun -n 5, I'll get an error
stating:
There are not enough slots available in the system to satisfy the 5
slots that were requested by the application:

  test

Either request fewer slots for your application, or make more slots
available for use.

A "slot" is the Open MPI term for an allocatable unit where we can
launch a process.  The number of slots available are defined by the
environment in which Open MPI processes are run:

  1. Hostfile, via "slots=N" clauses (N defaults to number of
     processor cores if not provided)
  2. The --host command line parameter, via a ":N" suffix on the
     hostname (N defaults to 1 if not provided)
  3. Resource manager (e.g., SLURM, PBS/Torque, LSF, etc.)
  4. If none of a hostfile, the --host command line parameter, or an
     RM is present, Open MPI defaults to the number of processor cores

In all the above cases, if you want Open MPI to default to the number
of hardware threads instead of the number of processor cores, use the
--use-hwthread-cpus option.

Alternatively, you can use the --oversubscribe option to ignore the
number of available slots when deciding the number of processes to
launch.
One of the ways to circumvent this is to use --oversubscribe which defines
that the nodes are allowed to be oversubscribed, even on a managed system,
and overloading of processing elements.
To pass this argument to mpiexec you can just add it to cafrun e.g.
cafrun -n 5 --oversubscribe ./test.
If you are interested in more options, please see mpiexec man page
Synchronization
Synchronization is an image control statement. It is used to control the ordering of code execution on different images. In other words, all statements on independent images before synchronization must complete before images can continue with execution of the rest of the code.
A program that uses coarrays consists of one or more execution segments.
Segments are separated by image control statements i.e. sync commands. If
there are no sync statements in a program, then the program is executed in
a single execution segment.
sync all
The first image control statement that we will look at is sync all. It is
used to synchronize the execution of all images. When execution on a single image
reaches the sync all statement it waits for all images before all of them
continue with the statements after sync all.
Better to illustrate it with an example. Let's say that we want two segments but we are executing the following code:
program main
  implicit none
  write (*,*) "First segment executed on image", this_image()
  write (*,*) "Second segment executed on image", this_image()
end program main
This code is executed as a single execution segment and the output looks like:
 First segment executed on image           2
 Second segment executed on image           2
 First segment executed on image           3
 Second segment executed on image           3
 First segment executed on image           4
 Second segment executed on image           4
 First segment executed on image           1
 Second segment executed on image           1
As you can see, the images are executed independently and there is no ordering of execution.
However, if we add sync all between write statements it will create
two segments where all images have to complete the first segment before
continuing to the second.
program main
  implicit none
  write (*,*) "First segment executed on image", this_image()
  call execute_command_line('')
  sync all
  write (*,*) "Second segment executed on image", this_image()
  call execute_command_line('')
end program main
This output looks like:
First segment executed on image           1
First segment executed on image           2
First segment executed on image           3
First segment executed on image           4
Second segment executed on image           2
Second segment executed on image           3
Second segment executed on image           4
Second segment executed on image           1
Please note the call execute_command_line('') statement, this is added due to
the fact that information to stdout is buffered. Using this statement after
the write causes the buffered information to be released. If you are interested
in detailed discussion around this topic, please see
Defect: "sync all" Doesn't Sync #693
and
FLUSHing the standard output to impose order in Coarray applications.
sync images
Another image control statement is sync images, it gives us a way to
synchronize between specific images. This statement takes a list of image
indices.
It's important to mention that if image X synchronizes with Y and Z then also
Y and Z have to have sync images statements for X image:
if (this_image() == 3) sync images( (/ 2, 4, 5 /) )
Here, image 3 waits for 2, 4, and 5. However, we also have to have corresponding statements:
if (this_image() == 2) sync images(3)
if (this_image() == 4) sync images(3)
if (this_image() == 5) sync images(3)
If you want to synchronize a particular image X with all images but not with
each other, you can use an asterisk:
if (this_image() == X) sync images(*)
if (this_image() /= X) sync images(X)
Please check
Example - Swapping values between images
to see sync images statement in action.
Examples
Read from an image
This example illustrates how we can set a value in one image and use it in others.
To achieve this we use if(this_image() == 1) to isolate the first image,
set a value, then sync all images which secures that the value will be set
before other images try to access it.
program main
  implicit none
  integer :: i[*]
  if (this_image() == 1) then
    i = 100
    write (*,*) "First image", this_image(), "set value", i
    call execute_command_line('')
  end if
  sync all
  i = i[1]
  write (*,*) "Reading from image", this_image(), "value", i
  call execute_command_line('')
end program main
The output is:
First image           1 set value         100
Reading from image           1 value         100
Reading from image           2 value         100
Reading from image           3 value         100
Reading from image           4 value         100
Swapping values between images
This example perfectly demonstrates the use of local and remote data access, image isolation, and synchronization.
The following code swaps values between the first and the last image:
program main
  integer :: img, nimgs, i[*], tmp
  img = this_image()
  nimgs = num_images()
  i = img

  if (img == 1) then
    sync images(nimgs)
    tmp = i[nimgs]
    sync images(nimgs)
    i = tmp
  end if

  if (img == nimgs) then
    sync images(1)
    tmp = i[1]
    sync images(1)
    i = tmp
  end if

  write (*,*) "Reading from image", img, "value", i
end program main
Which outputs:
Reading from image           3 value           3
Reading from image           4 value           1
Reading from image           1 value           4
Reading from image           2 value           2